CDex Tutorial #3 : File Structure |
 |
| by Don Walker | |
| February 29, 2004 | |
|
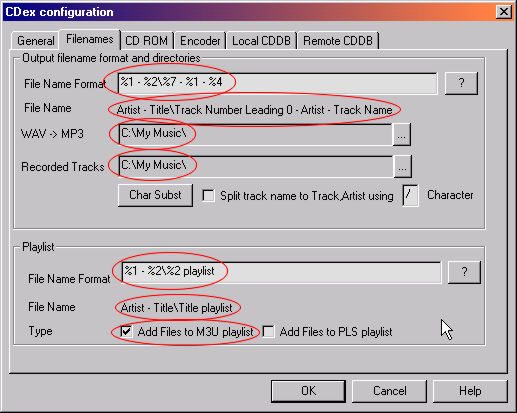
1. Using Windows Explorer, create a new folder on your C-drive. Like this: "C:\My Music" This is the folder that we will place your music files in. 2. Now back in CDex click on the “Filenames” tab in the "Settings (CDex Config.)" dialog.
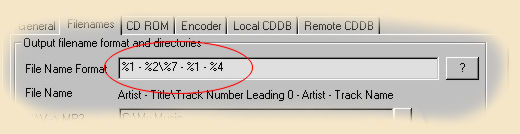
3. Here is where you tell CDex how to name your files and also where to place them on your hard drive. In the “File Name Format” box you will see %1\%2\%7-%4. We will change this later to what you see in the image above. Note that in the “WAV -> MP3” box CDex has placed its installed folder plus a subfolder called “my music” (We will change this later). This means that CDex will place your files in the “my music” folder under the CDex install folder. Also, the “Files Name Format” is telling CDex to create two other folders, one named using “Artist Name” (%1) and in that folder another folder named using the “Album Name” (%2). In that folder it will place the files and name them using the “Track number with leading zeros” (%7) plus a minus sign (-) and the “Track Name” (%1). This is not the way I would set-up CDex to do this. I like to place my music files in an easier place to find.
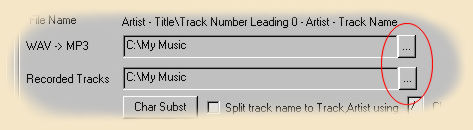
Using CDex's defaults, this is an example of what you would have. The Path: “C:\Program Files\CDex\my music\Ventures\In Space\002-Journey to the Stars.mp3” It is important for you understand this feature of CDex. I personally do not like to have too many sub-folders. So I will walk you through changing these options to the way I would run CDex. 4. If you have not created a sub-folder in the C: drive root named “C:\My Music” then do it now (see step one this page). This folder will be easier to get to. Now in the “Filenames” tab select the button that contains the 3 dots and change the two folders to C:\My Music.
5. We will also want to change the way CDex names our files. I like to have the Artists name in the file name so if I move the file to another folder I will still know who the artist is. Also, I only want one sub-folder under the “My Music” folder and I want that folder named using the "Artist Name" and "Album Name". So let’s change the “File Name Format” entry to the following.
Let me explain this option:
If you will click the button with the "?" on it you can see all naming options. Also below the type in window you will notice a sample of what your file name will look like. This is to the right of "File Name". 6. Now, using the image at the top of this page, set-up the "Playlist"; "File Name Format" and check the option to "Add Files to M3U playlist". 7. Now close the "CDex Configuration" dialog by clicking on the "OK" button and go back to the CDex Main Page and select the next tutorial. Have a question? Need help? Get free, friendly person-to-person help with your computer questions or spyware questions in our help forums! |