|
If you have an audio cassette tape that you'd like to transfer to a CD, it's easy to do with your PC and some standard inexpensive cables you can find at almost any electronics store. Read on for complete instructions.
EQUIPMENT NEEDED HARDWARE - Cassette Deck
- Computer With Sufficient Harddisk (to store the .wav files) and RAM (to edit and process the files)
- CD Writer
- Soundcard
- Interconnect cables for connection between the cassette deck and the soundcard
SOFTWARE - Audio Recording Software
- Noise Reduction Software or Plug-in (Optional)
- CD Authoring Software
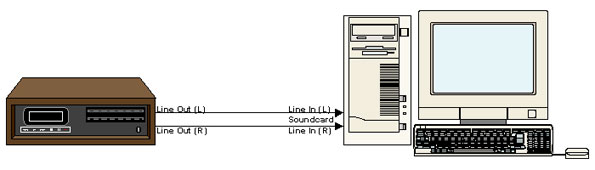
CONNECTIONS & PROCEDURES - Connect the LINE OUT of the Cassette deck to the LINE IN of the Computer Soundcard
- Select the soundcard as the prefered recording device (under control panel - multimedia icon)
- Ensure the LINE IN Fader on the audio mixer of the computer is not muted
- Launch the audio recording software
- Depending on the software used, activate and check all the settings to allow recording
- If possible, monitor the incoming signal from the cassette deck using the audio software to ensure the incoming signal is not clipping (Too Hot; Levels Too High)
- Set the appropriate levels for recording and rewind the cassette tape
- Activate the recording on the computer and playback the cassette tape
- Once the material on the cassette tape has been recorded into the computer, save the material as .WAV format and edit the wave files accordingly.(Break them up and save them into the individual tracks; process the files with the noise reduction software; edit out the unwanted parts; etc.)
- When all editing have been completed, the number of .wav files should correspond to the number of songs on the cassette, unless some songs have been omitted.
- Next, close the audio recording software (Be sure to save all your work) and launch the CD authoring software
- Select for audio CD writing and import the .wav files and arrange them according to the sequence required (Exact procedure of import would be dependent on the software used)
- Load in a blank CDR disc and write to the disc using disc-at-once mode and finalized as a CD-DA format (Exact procedure of writing would be dependent on the software used)
SUGGESTIONS - Chose a good CDR disc to ensure durability and intergity of the disc.
- Try with different brands to see which works well with your CD writer and can playback on your CD Player.
- Remember that the limit for a regular CDR is 74mins of audio or 650M byte of data.
- If you use a 80mins CDR disc, make sure both the CD writer and CD authoring software supports it.
- There are many software out there, some are specifically for recording or CD authoring while others are an all-in-one solution.
- Pick one that is most suitable to your needs, applications and budget.
- Ultimately, the quality of your end result will depend on several things such as the inital sonic quality of the cassette, the quality of the soundcard used, the power and flexibility of the computer, audio recording software and noise reduction software, your editing skills, etc. Now that you've transferred the music, read the Help2Go tutorial on converting that music to MP3 files. Click here to discuss this tutorial, ask questions, add something to the article, or read addendums. This article was reprinted with the permission of Eugene Seah and is not subject to the Creative Commons license. The original article can be found here.
Have a question? Need help? Get free, friendly person-to-person help with your computer questions or spyware questions in our help forums!
|