Revitalize Old Photographs with Adobe Photoshop |
 |
| by Oscar Sodani | |
| March 20, 2003 | |
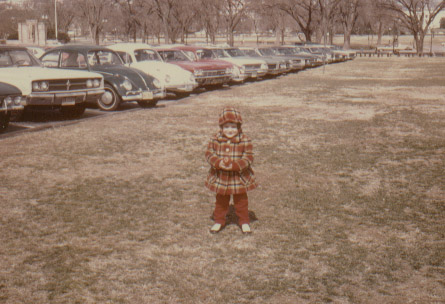
 Oscar Sodani is a founder of Help2Go and owner of Help2Go Networks, an IT consulting firm in the Washington D.C. area. Oscar holds the CISSP certification as well as industry certifications from Microsoft, Cisco and Novell. With your new scanner, its easy to scan in your old family photos. However, once you've scanned them, you should try to make them look their best. This Help2Go tutorial will show Adobe Photoshop owners how to make an old photograph look like it was taken just yesterday, in just a few minutes! For this tutorial, you will need Adobe Photoshop, which is a high-level graphics program. These concepts however, can often be applicable to other graphics programs, since they all try to copy Adobe Photoshop as much as possible. Scan Me and Cut Me! First, you'll have had to scan in your picture and start the Photoshop software. Help2Go's scanning hints can be found here. This is the picture we will be using as our example in this tutorial:
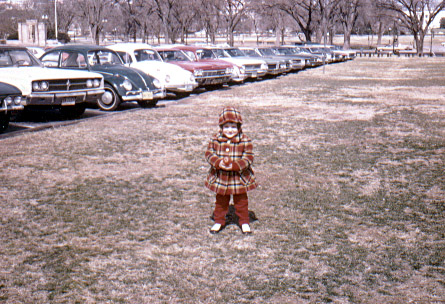
This photo was taken in January 1972, and it shows its age. As you can see, the edges of the photograph are clearly visible, showing the age of the Kodak paper it was printed on. The first step is to preserve only the most relevant parts of the photograph -- a process called cropping. The crop tool is the first tool in the toolbar. It looks like this: With your mouse, draw a box around the portions of the picture that you want to keep. When you've got it just the way you want it, double-click in the center of the photo. I've decided to crop out the edges of the photo, and here are the results:
There. No unsightly yellowed paper. Staying Level The levels of a photograph refer to the amount of lights and darks. Adjust these levels can provide additional contrast for your photograph, and a sharper, cleaner image. Under the Image menu, choose Adjust, then Levels, and Photoshop shows you a curve of all the lights and darks in the photograph. Adjusting this curve will adjust the contrast of your picture. However, Photoshop has another menu option that takes all the work out of it: Click on the Image menu Poof! Photoshop analyzes your image and decides the best contrast to use. Here's the result of the Auto levels function on our photograph:
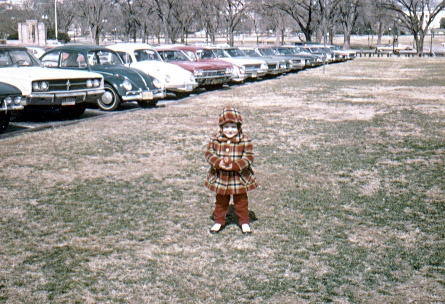
Looking Sharp! The next step is to take the blurriness out of the photo -- sharpen the edges to make objects stand out. The tool to use is called, paradoxically, the Unsharp Mask. Click on the Filter menu This one is a piece of cake -- by fiddling with the percentage, radius, and threshold, you can dramatically alter the sharpness of the edges of the objects in the picture. Fiddle with the controls until it looks just right -- make sure the Preview box is checked so you can immediately see the effects of each option. For my picture, I chose to sharpen 33%, with a 2.0 radius, and 0 threshold. Here are the results:
It may be a small improvement, but each change we make has a dramatic effect when combined with the rest. If your not sure, just scroll up to the original, and you can already see a big difference. Color Change The next thing to adjust is the balance of color in the photo. In photo editing, the three primary colors are Red, Green, and Blue. In printing, the three primary colors are Cyan, Magenta, and Yellow. These are the colors we'll be adjusting in the photograph. Click on the Image menu Here you see the primary colors. Which ones should we adjust? Well, they say that photos yellow with age, so you should definitely move the slider away from the Yellow and towards the Blue. The other two sliders can be different depending on the photograph. This particular picture has a lot of grass in it, so I increased the green. My final tally was 0 red, +30 green, +15 blue. The results:
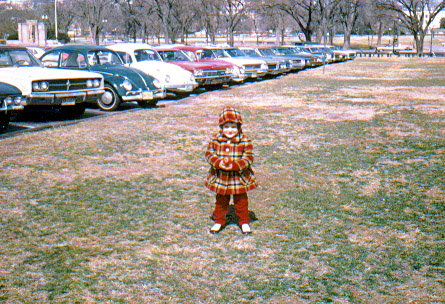
Saturate! I like bright colors in my pictures. Unfortunately, old photos seem to lose all their color right away. As photo editors, it is only right that we restore the photo to its former glory. Photoshop's saturation tool lets you bring out the color in all your photographs. In our example photo, the red in the clothing and the green of the grass are quite muted. Let's bring out da color!!! Click on the Image menu The slider we are interested in is the Saturation slider. Slide it up as far as you like it -- for my picture, I cranked it up to +50. Any higher than that, and it looked like the little tike was standing on radioactive grass! here's the result:
Now compare it with the original scanned image:
Amazing, huh? By following these quick steps, you can bring any old photo into the 21st century:
If you use a different photo editing program, and you would like to learn the steps particular to that one, send us an e-mail using the Feedback link. We'll recreate this article to reflect the steps in the most popular ones... Have fun! Have a question? Need help? Get free, friendly person-to-person help with your computer questions or spyware questions in our help forums! |