Capture a Screenshot with ScreenHunter |
 |
| by Oscar Sodani | |
| March 24, 2004 | |
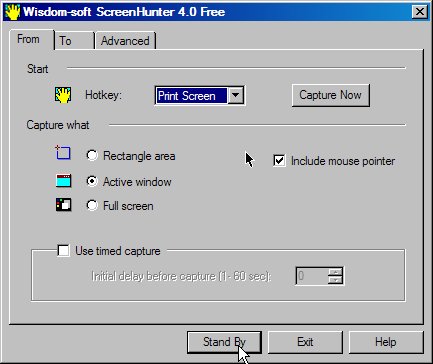
 Oscar Sodani is a founder of Help2Go and owner of Help2Go Networks, an IT consulting firm in the Washington D.C. area. Oscar holds the CISSP certification as well as industry certifications from Microsoft, Cisco and Novell. In this tutorial, we'll capture a snapshot of our screen with a free utility. This comes in very handy if you come across an error that's hard to explain. You can just take the snapshot and upload the image into your forum post! Installation To do this, we'll use the free version of ScreenHunter. You can download it directly from Help2Go here, or you can download the latest version from the publisher (just make sure you choose the FREE version when downloading from the publisher). Once you've downloaded the file, double-click on it to install. Once installed, you should see an icon on your desktop named "ScreenHunter Free 4.0". Double-click on this icon to start the program. Capture a Screenshot You should now see something that looks like the screen below. This is where you can change some of the settings. I prefer to capture only the active window (the window of the program you are currently working in), so I selected that option. I also checked the box that makes sure that my mouse pointer is visible when I take a screenshot. You can see my mouse pointer is over the Standby button. I've chosen the PrintScreen key as my "HotKey". This means that if ScreenHunter is running, and I want to take a screenshot of my current window, all I have to do is press the PrintScreen key on my keyboard. If you like, you may choose a different key on your keyboard to act as your HotKey.
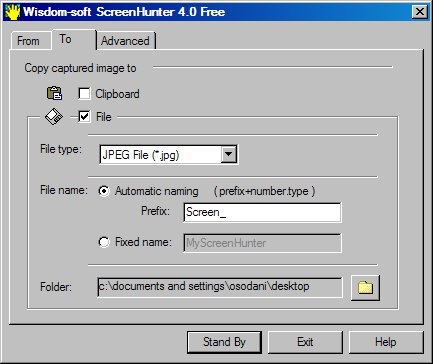
Now click on the "To" tab. These options control where and how your screenshots are saved. I prefer to save them as a file, and as JPEG images. I also chose to save my images to the Desktop -- go ahead and choose which directory works best for you (I recommend "My Documents" or the Desktop).
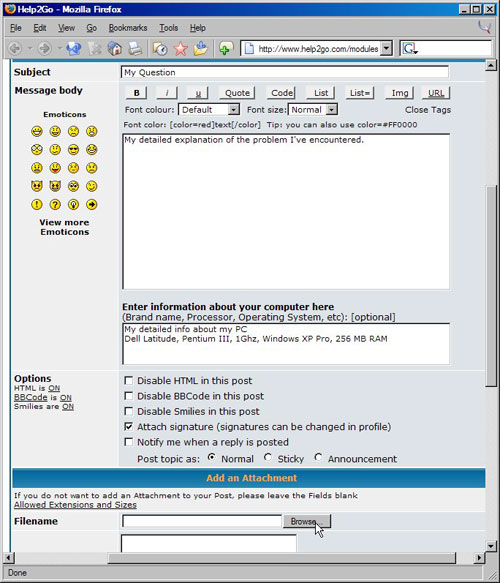
Now, just click on the Stand By button, and ScreenHunter will hide itself in your system tray. It doesn't take up many resources, and after you are done taking screenshots, you can exit the program. OK, let's take a screenshot! Load up your favorite program. When you're ready, press your PrintScreen key (unless you chose a different HotKey). Minimize your program, and you should now see a file on your Desktop (or whichever folder you chose in the previous section). If you double-click on your new file, you should see an image of your screen! Using Your Screenshot when Asking for Help Screenshots are great when you have an error message or a problem that you just can't explain. Whenever an error message pops up on my PC, I ALWAYS take a screenshot, just in case I need to refer to the exact error message later on. This idea works great in the Help2Go Question and Answer forums. When you post a new question to the forum, fill out the form as you normally would, then find the Browse button near the bottom of the screen -- this allows you to upload a file, such as your screenshot.
Once I've selected my screenshot file, I can type in a comment (this is optional). Then, I just need to the Submit button to post my question to the Help2Go Question and Answer forum. With the additional information and screenshot, my problem will be MUCH easier to recognize and troubleshoot! If you have any questions, don't hesitate to ask my clicking on the discussion link below. Have a question? Need help? Get free, friendly person-to-person help with your computer questions or spyware questions in our help forums! |